
MobilityCloud powered by Xeotype
Platform guide

Build a complete project record, step by step.

This practical guide follows the same order as an Erasmus+ project: prepare, write, approve, implement and archive. Use it as an onboarding path for project owners and collaborators.

7 project stagesSidebar menu referenceReal platform screens

Before you start

Set up the project so the record stays useful later.

1

Use a real project owner account

The project owner controls access, approval status and the project record. Invite collaborators after the project exists.

2

Keep official requirements close

MobilityCloud organises the work, but official Programme Guide and National Agency requirements always remain the source of truth.

3

Work in the project lifecycle order

Start with writing and planning. After approval, continue in the same project with implementation modules.

00

Sidebar menu

Use the left sidebar as your map of the platform.

The sidebar stays available while you work. It takes you to cross-project areas; once you open a project, its own tabs keep the application, implementation and evidence work connected to that project.

MCMobilityCloud

Tip The chevron collapses or expands the menu labels; it does not change data.

Project dashboard

Your starting screen: current projects, funding, priorities, milestones and quick actions.

How to use it: Open it first when you return to MobilityCloud or when you need to choose the next task.

Projects

Lists every project you can access and lets project owners start a new one.

How to use it: Use filters or search to find an existing project; open the project card to enter its workspaces.

My Tasks

Collects tasks assigned to you across accessible projects.

How to use it: Use the status, due-date and text filters to focus on open or overdue work. Completing a task updates the shared project record.

Search

Finds accessible projects, participants, expenses and documents from one place.

How to use it: Enter at least two characters. Search results take you directly to the relevant project area.

Calendar

Shows project, mobility and other relevant dates together.

How to use it: Use it to spot approaching milestones and check whether project dates have been configured.

Content Library

Stores your organisation’s reusable private writing blocks.

How to use it: Save approved wording here, then reuse and adapt it for new applications without recreating the text.

Individual Support

Calculates planning scenarios for Individual Support, travel and Organisational Support unit contributions.

How to use it: Use it for estimates before approval. It does not decide eligibility or replace official rates.

Public Library

Offers public reusable content blocks shared by the MobilityCloud community.

How to use it: Preview a block and import an editable copy into your own Content Library; the public original stays unchanged.
Navigation rule

Use the sidebar to move between areas that belong to your account. Use a project’s internal tabs to work inside that particular project, so you never mix up documents, people or budget data from different projects.

01

Prepare your workspace

Start from your dashboard, not from a folder.

The dashboard brings projects, available funding, current priorities and quick actions into one view. It is the best place to decide what needs attention first.
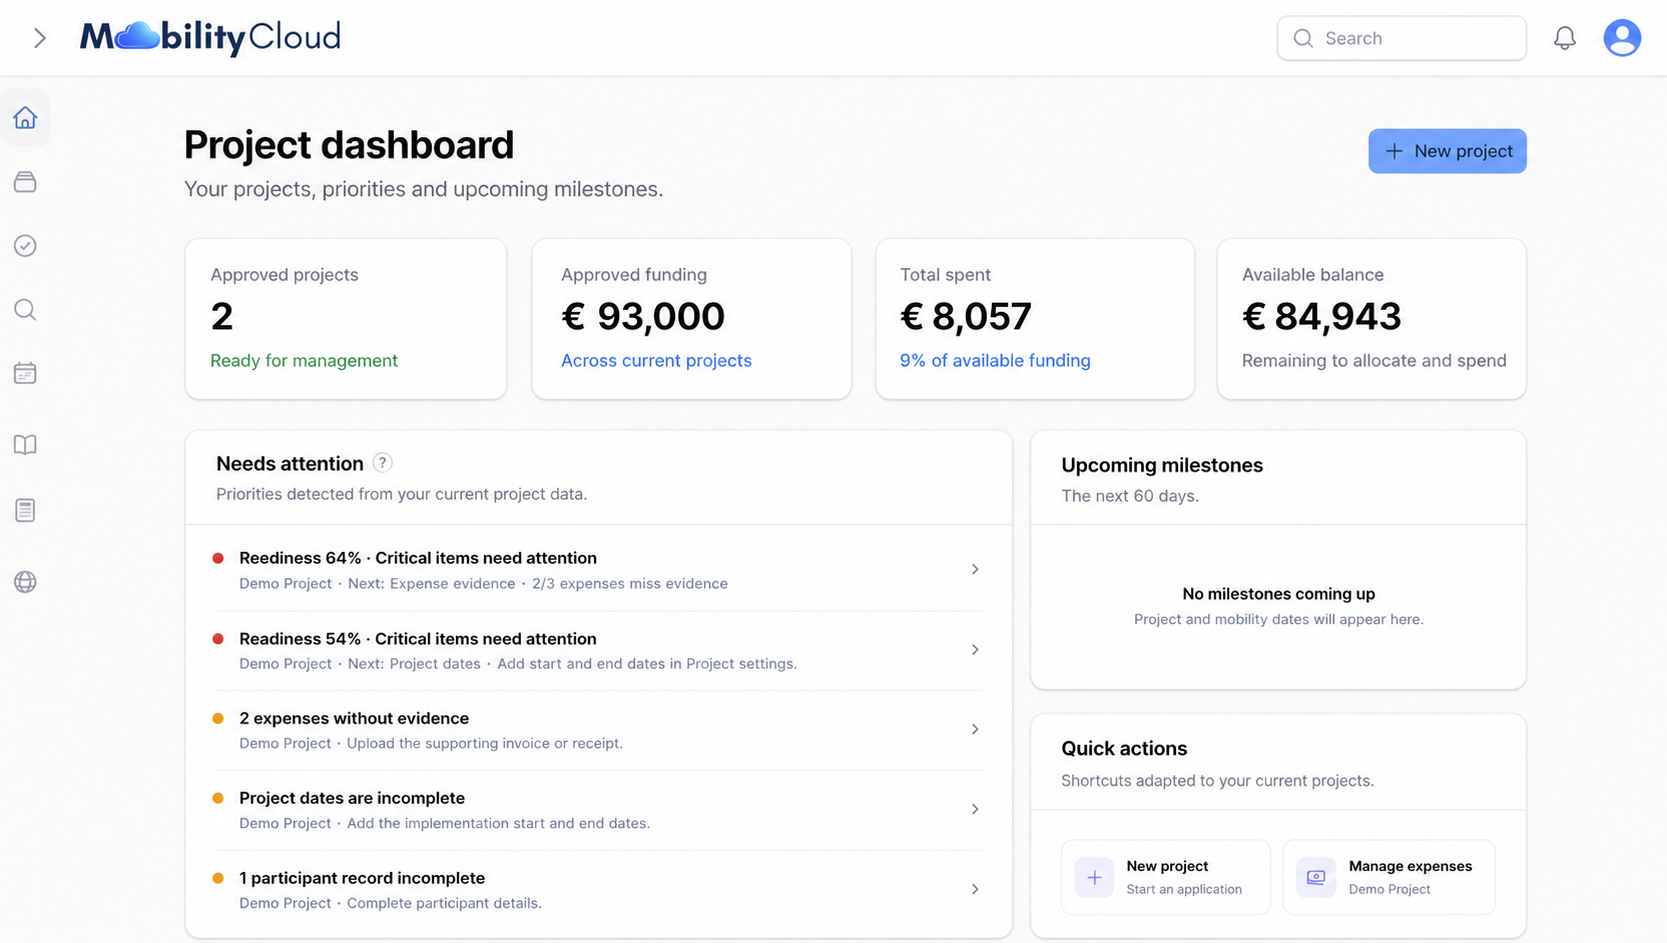
  1. Review the priority cards.Red and amber items point to incomplete project data, missing evidence or work that is due next.
  2. Open the relevant project.Each project keeps its own application, budget, participants, documents and mobility evidence.
  3. Use Quick actions for repeat work.Create a project, manage expenses, add participants or prepare documents without hunting through menus.
MobilityCloud project dashboard with funding, priorities and quick actions
Platform screen The project dashboard highlights funding, readiness and actions that require attention.
Good habit

Open the dashboard whenever you return to the platform. It helps you continue from the most important task rather than from the last tab you used.

02

Create a project

Create one project record for one mobility project.

Choose New project from the dashboard. Add the core identity details carefully; they become the context used across writing, planning and implementation.

  1. Name the project clearly.Use the name your team can recognise in exports, internal discussions and final files.
  2. Select the right action or template.Use a writing template for an application, or create an approved project if the application already exists.
  3. Add dates and partners.Project and mobility dates drive readiness checks; partner names give the project useful working context.
+New projectStep 1 of 2
Before approval

Keep the project in the writing or planning stage until you know the official result. The management modules are designed to continue after you declare approval.

03

Write and review

Use the application workspace one question at a time.

The writing view gives each answer a clear place. Move through the sections, use the guidance where needed and watch the readiness signal before exporting.

Activities and methodologySaved just now

Describe the activities, learning methods, preparation and how participants will be supported before, during and after mobility.

2,184 / 3,000 charactersReadiness 82%
  1. Read the prompt first.Answer the question that is shown, not a general version of it. Keep one clear idea per section.
  2. Save as you work.Use the section status and character count to see whether an answer is still incomplete.
  3. Review before export.Use readiness checks to locate gaps, then create a PDF or Word working copy for your team review.
03A

Table models

Choose a table only when rows make the answer clearer.

Tables are optional working tools, not official fixed fields. Use normal prose for a question that asks why, how or what you will learn. Add a table when you need to compare several groups, activities, costs, responsibilities or measures.

Write proseOne idea, rationale or explanation

Example: Why is the project needed? How will you prepare participants?

Add a tableRepeated facts that need comparison

Example: several activities, participant groups, costs, indicators or audiences.

  1. Read the exact question.Choose the model whose purpose matches the question, not the one that merely has a familiar name.
  2. Add one table, then name the columns.Select + Add table; type the column names from the chosen model, then use + Add row for every item you need to compare.
  3. Keep the written answer and table complementary.Use the answer field for the explanation and the table for the structured facts. Do not repeat the whole table in prose.

Activity plan

Use when the question asks what you will do, who will take part, when it happens or who is responsible.

Activity Purpose / method Participants Dates / duration Countries Responsible / output

Participant groups

Use when you need to compare national groups, participant profiles, inclusion needs or support roles.

Group / country Number Profile / age Fewer opportunities Support / leaders

Needs and additional costs

Use for a specific need, exceptional cost, inclusion support or other item that needs a clear justification.

Need / cost type Group concerned Description Why necessary Estimated cost

Evaluation matrix

Use when the question asks how objectives, results or impact will be measured.

Objective Indicator Evidence When checked Responsible

Dissemination plan

Use when you must show who will receive results, through which channel and how you will prove the reach.

Audience Message / result Channel Timing Owner Evidence
Keep it simple

Start with the smallest useful table: normally one table per question and only the columns you will actually fill. A table is included in the PDF and Word working exports exactly as you write it; you remain responsible for transferring and checking the final information in the official application system.

04

Declare approval

Move to implementation only after the official result.

When the project is approved, open its settings and declare the exact approved grant amount. The record then continues into budget, participant, document and mobility workflows.

1Official approval receivedConfirm the grant and project conditions outside MobilityCloud.
2Enter approved grantUse the exact approved amount, not an estimate.
3Management modules openCreate practical budget baskets and start implementation.
Important

MobilityCloud is an independent working platform. Approval decisions, contractual obligations and official reporting always remain with the competent National Agency and official systems.

05

Manage implementation

Keep spending and evidence connected to the project.

After approval, the project navigation gives each operational area its own workspace. Start with budget baskets, then add the people, files and daily mobility evidence needed for delivery.
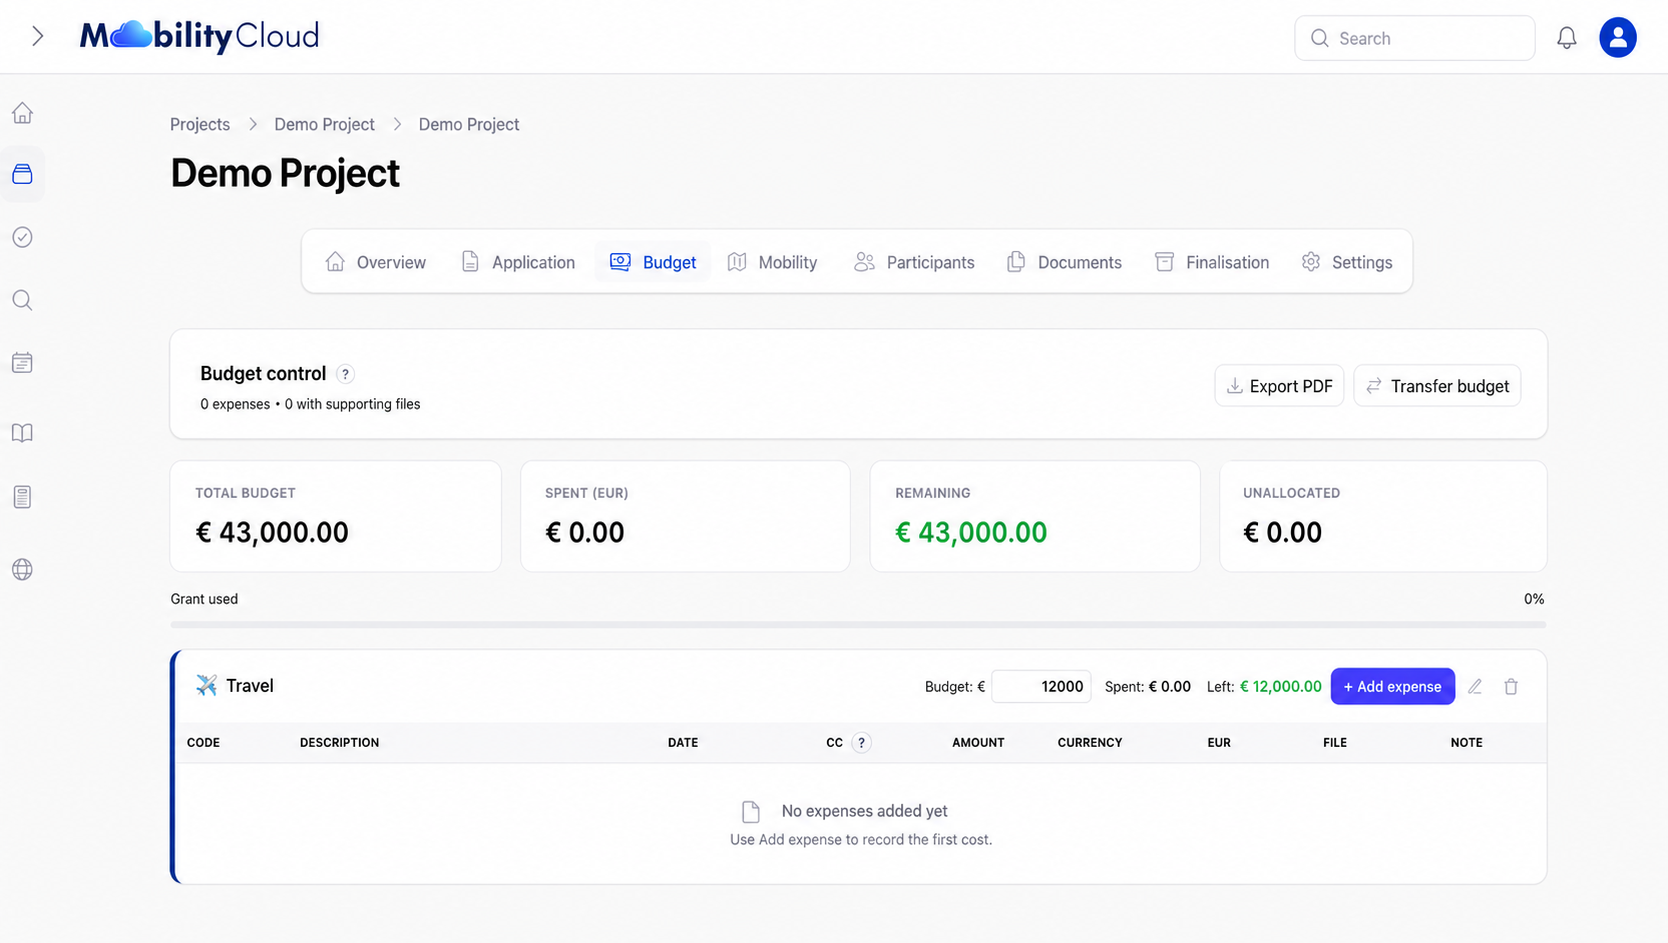
MobilityCloud budget screen with approved grant, spending and expense evidence
Platform screen Budget control shows the approved grant, remaining balance, expense rows and supporting files in one project view.

Budget

Create baskets, enter expenses and attach the relevant invoice, receipt or support file.

Check: amount, currency, evidence

Participants

Add the group when it is known, complete required details and keep participant documents connected.

Check: contacts, documents, status

Documents

Separate project files, generated records and signed copies so the document list remains understandable.

Check: checklist and signed copies

Mobility evidence

Create one entry for each activity day and add photos, links, notes and files while the mobility happens.

Check: every day has proof
Lisbon mobility · 12–16 May16 participants
01
Arrival and welcome8 photos · 2 files · attendance list
Complete
02
Digital workshop12 photos · agenda · participant reflections
Complete
03
School visit and reflection6 photos · 1 note still needed
Add note
06

Prepare final files

Archive continuously, not in the final week.

The finalisation stage is easier when the record has been maintained during implementation. Use the checks below before you prepare files for internal review or official reporting.

Project details and dates are completeGrant value, project period, mobility period and key organisations are correct.
Expenses have supporting evidenceFiles are attached where your team needs them and spending is reviewed by basket.
Participant and mobility records are completeRequired participant data and daily activity proof have been reviewed.
Documents and outputs are organisedSigned copies, materials, dissemination evidence and links can be found quickly.

Ready for your final preparation

One project record. A clearer handover.

Use the project views and exports as an organised working archive. Verify each official submission requirement separately before sending it.

07

Button reference

What each core button and control does.

Use this reference while working in the platform. Controls are grouped by the screen where they appear, so you can find the action before you use it. Labels can differ slightly when your role is view-only or a project is not yet approved.

Navigate or viewCreate or addUpload or importChanges project stateDestructive action

Available across the platform

Global navigation

MobilityCloud logo

Returns to the project dashboard.

Use it when you want to switch projects or check priorities.

Expand sidebar

Shows or hides the left navigation labels.

It only changes the layout; it does not change project data.

Global search

Searches the information available to your account.

Use specific project, participant or document words for faster results.

Notifications

Opens account and project notifications.

Review notifications after invitations, requests or important project activity.

User menu

Opens your account settings and sign-out options.

Use Account settings to maintain personal and billing information.

Inside one project

Project header and tabs

Project access

Invites collaborators and manages their access to this project.

Give access only to people who need this project. Project access does not expose other projects.
+

Add task

Creates a manual follow-up task for the project team.

Use it for responsibilities that are not automatically detected by readiness checks.

Overview

Shows stage priorities, readiness, funding and project details.

This is the best place to decide what to work on next.

Application / Budget / Mobility / Participants / Documents / Finalisation

Opens the relevant project workspace without losing the project context.

Tabs do not create or save anything by themselves.

Mark as completed

Moves a project to the completed state when implementation is genuinely finished.

Review final files first. This is a project status change.

Writing and review

Application workspace

Section list

Moves between application questions and shows which sections are complete or still need work.

Work from top to bottom for a coherent application.

Answer field

Stores the text for the selected application question.

Use the question guidance and character counter to keep the answer focused.

Writing outline icon

Adds a text-only answer outline with prompts for context, examples, responsibilities and results.

It never creates or fills a table. Edit or delete the outline text before using it in your answer.

Writing library

Opens reusable writing content and guidance.

Import or adapt content; always make sure it fits the actual project.
+

Add table / Column / Add row

Creates an optional, editable table below the current question.

Use a model from the table guide only when repeated facts are clearer in rows than in prose.

Readiness check

Highlights incomplete or weak application areas before export.

It is a working signal, not an official eligibility or approval decision.

Export PDF / Word

Creates a working export of the application content.

Use exports for internal review. Verify official submission format separately.

Approved-project implementation

Budget control

Export PDF

Downloads a project budget summary in PDF format.

Useful for internal review; it does not submit anything to an authority.

Transfer budget

Moves an amount between existing budget baskets.

Check the project rules and the new totals before saving the transfer.
+

Add expense

Adds a new expense row to the selected basket.

Enter the cost, date, currency and supporting information before relying on the total.

Upload file icon

Attaches a supporting invoice, receipt or file to that expense.

Attach the evidence while it is easy to identify, not at final-report time.

Notes icon

Adds a short internal explanation to an expense.

Use it for context that is not clear from the file name or description.

Edit basket / Add new basket

Changes a basket or creates another category for budget tracking.

Keep categories understandable for your own project team.
!

Delete basket or expense

Removes the selected budget record.

This is destructive. Confirm that the record is genuinely incorrect before removing it.

Records and supporting files

Participants and documents

+

Add participant

Creates one participant record manually.

Use it for individual additions or corrections after an import.

Import CSV

Imports multiple participant rows from a CSV file.

Check column names and sample data before importing a full group.

Registration link

Creates or manages the public link used for participant self-registration.

Share the link only with the intended group and close it when registration ends.

Upload project file

Adds a general project document such as a source file, agreement or supporting record.

Choose a clear title and category so the file can be found later.

Upload signed copy

Adds or replaces the signed version of a generated record.

Use the signed-copy action rather than mixing signed files with unrelated documents.

Search and filter

Narrows the document or participant list without changing data.

Use filters before assuming a record is missing.

Daily proof and handover

Mobility evidence and finalisation

+

Add evidence day

Creates a day card for a mobility activity.

Create the day before or during the activity so evidence follows the real timeline.

Upload images

Attaches photos to one evidence day.

Add a short batch note so later reviewers understand what the images show.

Upload files

Attaches agendas, worksheets, presentations, certificates or other files to one evidence day.

Use the day that best explains why the file belongs to the mobility.
!

Delete evidence day

Removes the day entry while uploaded files remain in the project files list.

This is destructive for the timeline entry. Use only for duplicate or incorrect days.

Upload material or output

Adds project-wide materials, outputs or implementation files.

Use this for content that belongs to the project but not to one specific mobility day.

Finalisation checks

Shows which records still need review before final preparation.

Treat this as your internal checklist; confirm official submission requirements separately.
Access matters

If a control is missing or disabled, your project role, project stage or account status may not allow that action. Ask the project owner before trying to work around access limits.

Ready to bring your next Erasmus+ project into one place?

Create an account, verify your email and start preparing your first project in MobilityCloud.

Start now Sign in